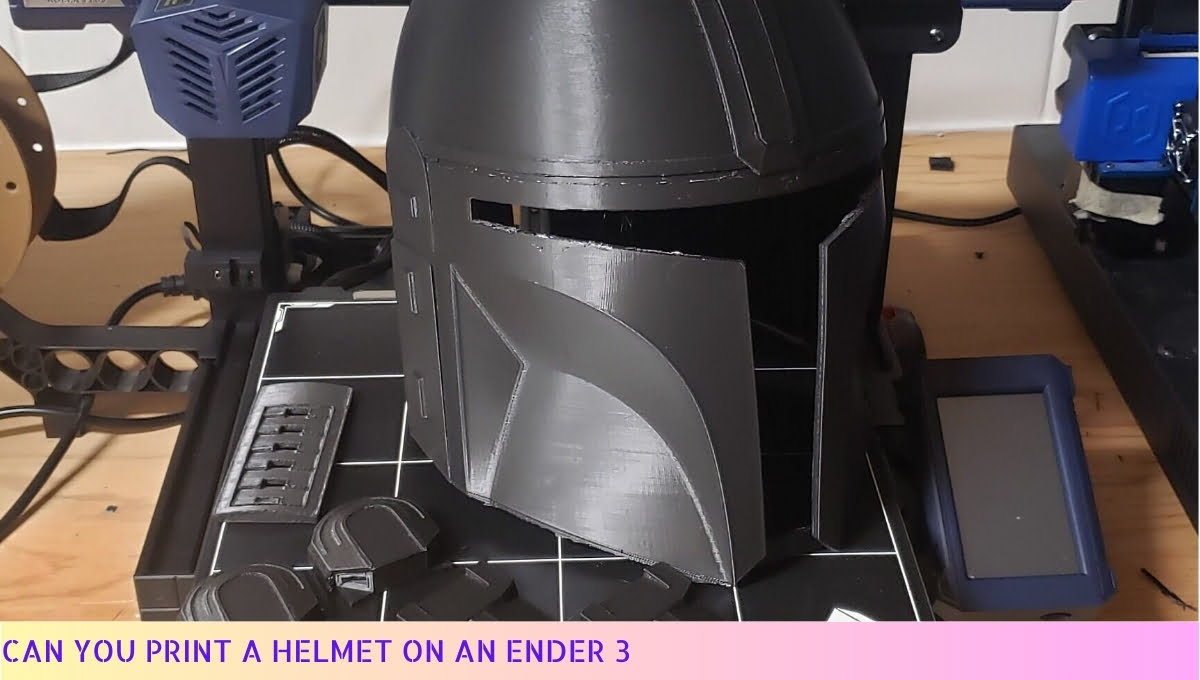
Yes, you can print a helmet on an Ender 3.
The Ender 3 is a versatile 3D printer that can handle various projects, including printing a helmet. With its decent build volume and reliable printing capabilities, you can create a custom helmet design and bring it to life.
Whether you’re a cosplayer, a hobbyist, or simply looking to personalize your headgear, the Ender 3 can handle the task with ease.
Just make sure to use the appropriate filament and take into account the size limitations of the printer’s bed. Get ready to rock your custom-printed helmet!
I. The Ender 3: An Introduction
Hey there! Let’s talk about the Ender 3, a nifty little 3D printer that’s been making waves in the world of DIY enthusiasts.
This bad boy is affordable, reliable, and packs quite a punch when it comes to printing all sorts of cool stuff. So, buckle up and let’s dive into the wonderful world of the Ender 3!
Now, you might be wondering if it’s possible to print a helmet using the Ender 3. Well, my friend, the answer is a resounding yes!
With a bit of know-how and some careful considerations, you can create your very own headgear straight from your printer. It’s like being a superhero with your own custom-made helmet!
But before we get into the nitty-gritty of printing a helmet, there are a few things you should keep in mind. First and foremost, safety should always be your top priority.
Make sure you have a well-ventilated workspace and use materials that are safe for 3D printing. We don’t want any mishaps while you’re rocking that awesome helmet!
Another important consideration is the size of your printer’s build plate. Helmets can be quite large, so you need to make sure your Ender 3 can handle the size.
Measure twice, print once, as they say! You don’t want to end up with a helmet that’s too small for your head.
Now, let’s get down to the juicy part: tips for successful helmet printing on an Ender 3.
These nuggets of wisdom will help you achieve top-notch results and avoid any frustration along the way. Trust me, I’ve been there, and I’ve learned a thing or two!
- Choose the right filament: When it comes to printing a helmet, you want a material that’s sturdy and durable. ABS or PETG filaments are great options that can withstand the wear and tear of everyday use.
- Layer height matters: To ensure a smooth and detailed finish, go for a smaller layer height. This will give your helmet that professional look and feel.
- Support structures are your friends: Helmets often have intricate designs and overhangs that require support structures. Don’t skimp on these, or you might end up with a wonky-looking helmet.
- Take it slow: Printing a helmet can take quite some time, especially if you’re going for high-quality results. Patience is key here, my friend. Sit back, relax, and let your Ender 3 work its magic.
So there you have it, a brief introduction to the Ender 3 and some handy tips for printing a helmet. With a little bit of practice and a whole lot of creativity, you’ll be rocking a custom-made headpiece in no time. Happy printing!
II. 3D Printing Helmets: Is It Possible?
So, you’re wondering if it’s possible to 3D print helmets? Well, buckle up and get ready for an exhilarating ride through the world of 3D printing! Let me tell you, my friend, the possibilities are endless.
When it comes to creating helmets, 3D printing opens up a whole new dimension of creativity. Gone are the days of settling for mass-produced helmets that lack personality and uniqueness.
With the power of the Ender 3 at your fingertips, you can now design and print your very own customized helmets that are tailored to your exact specifications.
But hold your horses, my eager friend! Before you delve into the world of helmet printing, there are a few things you need to consider.
Let’s dive in and explore the key factors that will ensure a successful helmet printing journey on your trusty Ender 3.
Considerations for Printing a Helmet on an Ender 3
Printing a helmet is no small feat, and it requires careful planning and attention to detail.
Here are a few important considerations to keep in mind:
- Size: Make sure the helmet design fits within the build volume of your Ender 3. Measure twice, print once!
- Materials: Choose the right materials for your helmet. Consider factors such as durability, flexibility, and weight. ABS and PLA are popular choices, but don’t be afraid to explore other options.
- Support Structures: Helmets often have intricate designs and overhangs that may require support structures during printing. Be prepared to experiment and fine-tune your support settings to achieve the best results.
- Post-Processing: After printing, you may need to do some post-processing to achieve a smooth and polished finish. Sanding, painting, and adding additional details can take your helmet to the next level.
Now that you have a solid understanding of the considerations, let me share some valuable tips to ensure your helmet printing journey is a success. Trust me, these tips will save you from a world of frustration and wasted filament.
Tips for Successful Helmet Printing on an Ender 3
1. Calibration is Key: Before diving headfirst into printing your helmet, make sure your Ender 3 is properly calibrated. This will ensure accurate dimensions and reduce the chances of failed prints.
2. Bed Adhesion: To prevent your helmet from warping or detaching from the print bed, use a reliable bed adhesive like painter’s tape or a specialized 3D printing adhesive. Trust me, you don’t want your helmet to take flight mid-print!
3. Layer Height: Finding the right layer height is crucial for achieving a balance between print quality and print time. Experiment with different layer heights to find the sweet spot for your helmet design.
4. Temperature Control: Different materials require different printing temperatures. Consult the manufacturer’s recommendations and adjust your printer settings accordingly. Remember, a well-tempered printer makes for a happy helmet.
5. Print Orientation: The orientation of your helmet during printing can greatly affect the overall quality. Experiment with different orientations to minimize the need for support structures and achieve the best surface finish.
6. Patience is a Virtue: Rome wasn’t built in a day, and neither is a 3D printed helmet. Be patient, my friend.
Printing a helmet can take time, especially if you’re aiming for intricate designs and fine details. Trust the process and let your Ender 3 work its magic.
Now that you’re armed with these invaluable tips, it’s time to unleash your creativity and start printing those epic helmets.
Remember, my friend, the sky’s the limit when it comes to 3D printing. So buckle up, hold on tight, and embark on this thrilling adventure. Happy printing!
III. Considerations for Printing a Helmet on an Ender 3
So, you’re thinking about printing a helmet on your trusty Ender 3? That’s a bold endeavor, my friend! But before we dive into the nitty-gritty details, let’s take a moment to consider a few important factors.
After all, successful helmet printing requires careful planning and attention to detail.
1. Size Matters
First things first, you need to determine the size of the helmet you want to print. Helmets come in various shapes and sizes, so it’s essential to choose one that fits your needs.
Consider the intended wearer and their head measurements to ensure a proper fit. Don’t be tempted to go for a one-size-fits-all approach; it’s better to customize the helmet’s dimensions for optimal comfort and safety.
2. Material Selection
The choice of material for your helmet can make a world of difference. PLA, ABS, PETG, or even flexible filaments like TPU are commonly used for 3D printing helmets.
Each material has its own unique properties, such as strength, flexibility, and temperature resistance. Take the time to research and select the material that best suits your requirements.
3. Print Orientation
When printing a helmet, the orientation plays a vital role in achieving the desired outcome. It’s important to find the right balance between minimizing support structures and maintaining structural integrity.
Experiment with different orientations to find the optimal one that ensures a smooth surface finish and adequate strength.
4. Layer Height and Infill
The layer height and infill percentage are crucial factors that directly impact the quality and durability of your printed helmet. A lower layer height, such as 0.1mm, can result in finer details, but it also increases printing time.
As for infill, a higher percentage, like 20-30%, provides added strength to the helmet. Strike a balance between print time and desired quality to achieve the best results.
5. Post-Processing and Finishing
Once your helmet is printed, it’s time to give it some love and attention. Depending on the material and desired finish, you may need to perform post-processing techniques like sanding, priming, and painting.
These steps not only enhance the aesthetics but also improve the overall durability and protection offered by the helmet.
Remember, printing a helmet on an Ender 3 requires patience, experimentation, and attention to detail. Take your time to understand the intricacies of the process, and don’t be afraid to learn from your mistakes.
With the right approach and a sprinkle of creativity, you’ll soon be donning a custom-made helmet that’s the envy of all!
IV. Tips for Successful Helmet Printing on an Ender 3
Printing a helmet on an Ender 3 can be an exciting and rewarding project.
To help you achieve the best results, here are some valuable tips:
- Choose the right filament: Selecting the appropriate filament for your helmet is crucial. Consider using ABS or PETG, as they offer good strength and durability.
- Ensure proper bed leveling: Before starting your print, make sure the printer bed is leveled correctly. This will ensure that the first layer adheres properly and prevents any warping issues.
- Optimize print settings: Experiment with different print settings to find the optimal balance between print quality and speed. Adjust parameters such as layer height, print speed, and infill density to achieve the desired outcome.
- Use supports: Helmets often have complex shapes and overhangs. Enable supports in your slicer software to provide stability during the printing process. Be sure to remove them carefully after printing.
- Consider split printing: If your helmet design is too large for the Ender 3’s build volume, consider splitting it into multiple parts. This allows you to print each section separately and then assemble them later.
- Implement cooling strategies: To prevent overheating and improve print quality, ensure that your printer’s cooling fans are functioning properly. You can also experiment with adding additional cooling fans or using a fan duct.
- Post-processing: After printing, you may need to perform some post-processing to achieve a smooth finish. Sanding, priming, and painting can enhance the appearance of your printed helmet.
- Be patient and persistent: 3D printing can sometimes be a trial-and-error process. Don’t get discouraged if your first attempt doesn’t turn out perfectly. Learn from any mistakes and make adjustments for future prints.
By following these tips, you’ll be well on your way to successfully printing a helmet on your Ender 3. Remember to have fun and enjoy the creative journey!
Can You Print A Helmet On An Ender 3 – FAQs
1. Can you print a helmet on an Ender 3?
Yes, you can print a helmet on an Ender 3 3D printer. The Ender 3 is capable of printing various objects, including helmets, as long as they fit within the printer’s build volume.
2. What materials can be used to print a helmet on an Ender 3?
The Ender 3 can print with various materials, such as PLA, ABS, PETG, and TPU. These materials offer different properties in terms of strength, flexibility, and durability, allowing you to choose the most suitable material for your helmet.
3. How long does it take to print a helmet on an Ender 3?
The printing time for a helmet on an Ender 3 depends on several factors, including the size, complexity, and layer height of the print. Generally, it can take several hours to complete a helmet print, but the exact time can vary.
4. Do I need any additional modifications to print a helmet on an Ender 3?
In most cases, you won’t need any additional modifications to print a helmet on an Ender 3. However, if you want to enhance the print quality or optimize the printing process, you may consider adding upgrades such as a glass bed, upgraded extruder, or improved cooling system.
5. Are there any recommended settings for printing a helmet on an Ender 3?
While specific settings may vary depending on the material and design of the helmet, some general recommendations include using a suitable layer height, adjusting the print speed, ensuring proper bed adhesion, and optimizing the cooling settings to prevent warping or stringing.
6. Can I resize a helmet model to fit on an Ender 3?
Yes, you can resize a helmet model to fit on an Ender 3. However, it’s important to ensure that the resized model still maintains the necessary proportions and structural integrity. Using 3D modeling software, you can scale the model to fit within the printer’s build volume.
7. Can I print a full-size helmet on an Ender 3?
Printing a full-size helmet on an Ender 3 may not be possible due to the printer’s limited build volume. However, you can print the helmet in separate parts and then assemble them using various joining techniques, such as gluing or using threaded inserts.
8. How durable are 3D-printed helmets from an Ender 3?
The durability of 3D-printed helmets from an Ender 3 depends on the material used and the design of the helmet. While some materials like ABS or PETG offer good strength and durability, it’s important to consider the limitations of 3D-printed objects in terms of impact resistance and structural integrity.
9. Can I paint a 3D-printed helmet from an Ender 3?
Yes, you can paint a 3D-printed helmet from an Ender 3. After the printing process is complete, you can use various painting techniques and materials, such as spray paint or acrylics, to customize and add color to your helmet.
10. Are there any safety considerations when printing a helmet on an Ender 3?
When printing a helmet on an Ender 3, it’s important to ensure that the helmet provides adequate protection and meets any necessary safety standards. Additionally, proper ventilation and adherence to safety guidelines, such as wearing appropriate personal protective equipment, should be followed when operating the printer and handling materials.
Wrapping Up
So, there you have it! In conclusion, the Ender 3 is a fantastic printer that can handle a wide range of projects, but printing a helmet might be a bit of a stretch.
While it’s technically possible, the size limitations and the complexity of the design may pose some challenges.
However, don’t let that discourage you! The Ender 3 is still a versatile machine that can bring your creative visions to life. Just remember to choose your projects wisely and push the boundaries of what’s possible. Happy printing!

